How to deploy and configure keycloak
Goals
- One central Keycloak/SSO instance for varios OpenShift Cluster
- Keycloak use Google as identifyprovider (via oauth)
- Configurat OpenShift with two different Identify Providers:
- "COE SSO Admin"
- User created with
-adminpostfix - User is automatic in keycloak group
idp-coe-sso-admin - "COE SSO"
- User is automatic in keycloak group
idp-coe-sso
- Keycloak provide a group
coe-sso-adminwhere we add admin user - OpenShift Cluster give group
coe-sso-admincluster-admin privileges:oc adm policy add-cluster-role-to-group cluster-admin coe-sso-admin
Keycloak installation
- Install following operators via OperatorHub
- CloudNativePG (Cerified Operator)
- Keycloak Operator (Red Hat Operator)
Spinup PostgreSQL database via CloudNativePG
In my setup we use SAN Storage (iscsi) provided from a Netapp via Trident and the database should run on my control plan/master nodes.
postgresql cluster cr
Spinup Keycloak
-
I'm using a customer DNS name,
sso.coe.muc.redhat.comDNS configuration: -
SSL Certificate for
sso.coe.muc.redhat.comis stared in Vault and copied into a secret via ExternalSecret OperatorExternalSecret
-
Deploy Red Hat Build of Keycloak
Keycloak
GitOpsified deployment is here: https://github.com/stormshift/clusters/tree/main/isar-apps/keycloak
Keycloak Configuration
Login into keycloak, in my case https://sso.coe.muc.redhat.com
Get the initial admin user and password:
Create a new realm coe-sso
-
Create realm
-
Realm name: coe-sso
Add group idp-coe-sso
-
Select Groups on the left
-
Click Greate group
-
Fill out the form, Name:
idp-coe-sso -
Click Create
Add identity provider
-
Go to "Identity providers" and select one provider of choice - in my case Google.
-
Fill out the form in your Keycloak instance:
-
Copy the Redirect URI and paste it into Google's Authorised redirect URIs part, details: Red Hat SSO - via Google
-
Copy & Paste Client ID and Client Secret from Google to Keycloak
-
Click Add
-
Configure Identity provider
-
Advanced settings -> Switch on Trust Email
-
Add Hardcoded Group mapper,
-
Go to your identity provider, click Mappers tab next to Settings tab
-
Fill out the form:
-
Create another realm coe-sso-admin
Idea here is having a second realm analog to the first one, but it creates user with -admin post-fix to the username.
-
Create a new realm and add identity provider, as described above.
-
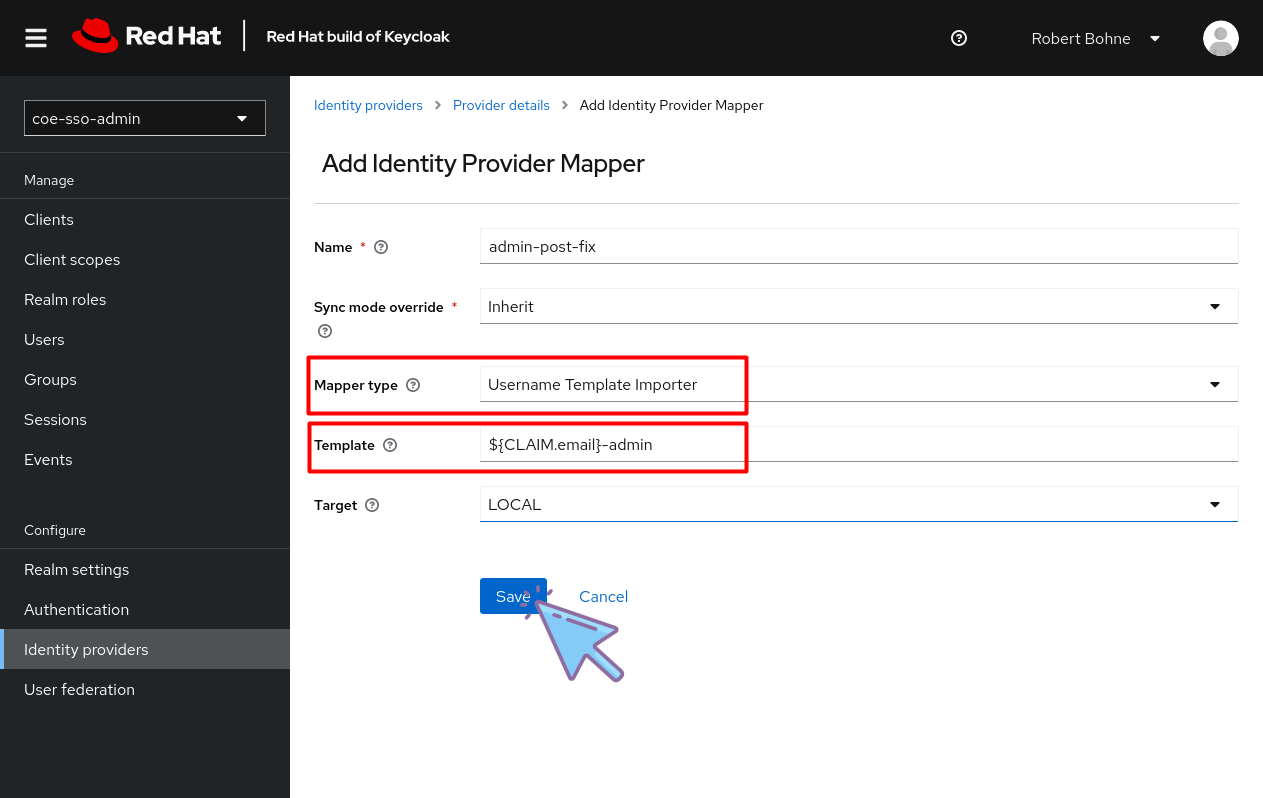
Add a Username Template Importer mapper
-
Go to your identity provider, click Mappers tab next to Settings tab
-
Fill out the form:
-
Template:
${CLAIM.email}-admin??? note "Screenshot"
1
-
Skip the Keycloak login page
-
Click Authentication at the left menu
-
Select Tab Flows
-
Click Flow name browser
-
Configure Identity Provider Redirector
Create Client for OpenShift Cluster
-
Click Clients
-
Select Tab Client list
-
Click Create client
-
General Settings
- Important is here Client ID, this is needed for OpenShift OAuth config later
-
Capability config
-
Login settings
-
Valid redirect URIs:
https://oauth-openshift.apps.$cluster-name$.$basedomain$:443/oauth2callback/* -
Web origins:
https://oauth-openshift.apps.$cluster-name$.$basedomain$:443
-
-
Click Create
-
Select tab Client scopes
-
Click
$NAME-dedicted client scope -
Click Configure a new mapper
-
Click Group Membership
-
Fill out form
-
Go back to Client details
-
Select tab Credentials
-
Store/Copy Client secret this is needed for OpenShift OAuth config later
Configure Keycloak at your OpenShift Cluster
-
Go to Administration -> Cluster Settings -> Configuration -> OAuth
-
Added YAML and add OpenID Connect provider:
Resources
- https://keycloakthemes.com/blog/how-to-setup-sign-in-with-google-using-keycloak
- https://medium.com/keycloak/using-keycloak-identity-provider-to-secure-openshift-f929a7a0f7f1


